The menu is dynamic according to your permissions when logging in.
The menu shown below has full Administrator and Manager permissions.
Home :
Takes you back to the default Map with the current Closure Events.
New Closure :
Create New Closure Screen.
Known Trouble Spots :
Shows your list of Known Trouble Spots.
Map :
Allows you to select from a series of maps showing different information, from the type of closure, to history of reopened roads.
Manage Lists :
Allows you to manage your lists. Deployable Signs, Underlying Cause, Maintenance Zones and also force an update to Mobile Devices if required.
Admin :
Add / Manage Users and adjust System Parameters if Required.
Visuals :
Offers the option to hide / show the Banner / Footer if required.
Help :
Link to support information if required.
1.2) Searching for Closures
The Map is designed to automatically resize to fit all the returned events onto the viewable area.
Where you are looking for a specific closure, you can use the search icon to perform a textual search across the content of the closure.
To perform a search, click the Magnifying glass at the top of the map.
You can enter any series of text criteria that might be representative of the Closure Event you are searching for,
and further narrow the search by nominating the “Active Between” Dates.
You can also use the “Map” menu to quickly find Closure Events, both current and reopened between different time frames.
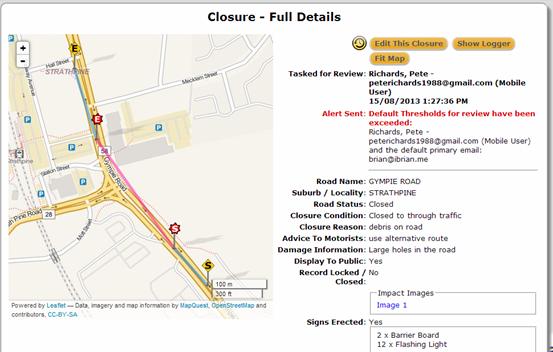
1.3) Viewing Closure Details
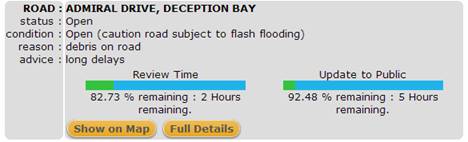
Below the map, a list of the Closure Events is displayed with the basic information.
In the above example we can see that Admiral Drive, Deception Bay is Open with caution.
It has another 2 hours before the Review is due, and 5 hours before the Public Update is due.
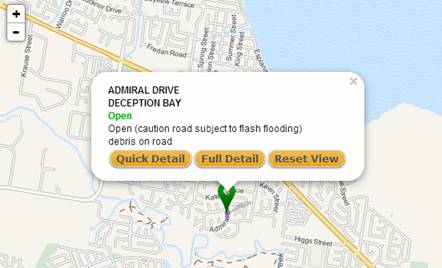
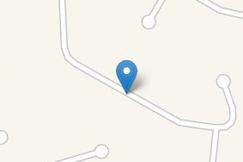
To locate the Closure on the map, click the “Show on Map” button.
The map will zoom into the location, and activate the pin popup with the basic information displayed.
From the list below the map, or from the pin popup, you can click on the
“Full Detail” button to see the Full Details of this closure.
It will take you to a new screen with the details listed on the Right Hand Side.
2) Adding a New Closure in the Browser Interface
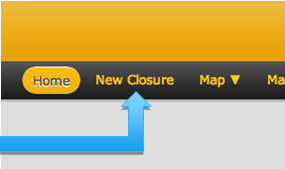
Select the “New Closure” button from the menu bar. You will have to be logged in to access this feature.
You should now be in the “Edit Closure” Screen,
this is where you can enter information about the new closure.
Start by selecting the Maintenance Zone / Region, you can do this by selecting one of the radio buttons shown below.
Note – The Maintenance Zones shown are the default only.
We recommend you delete or add Maintenance Zones to suit your Organization.
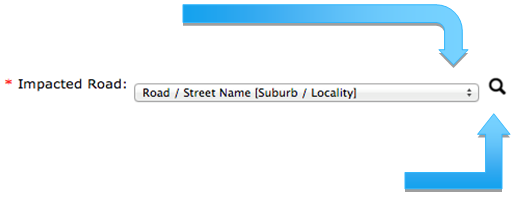
Once the Zone has been selected you can then select the Impacted Road from the drop down list by clicking the arrows.
The map will automatically update to the roads position when you click the magnifying glass and select the geo locator match.
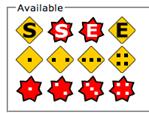
You will notice on the available signs in the locations tab, these represent the various signs
to be used in the road closure and can be placed on the map accordingly.
Start of Signage
End of Signage
Start of Impacted Area
End of Impacted Area
Other Signage Points
Other Impact Points
* In the event you want to be able to mark additional locations for impacts and signage we allow 4 optional impact and signage markers.
E.g. A road was closed at an intersection, put other signs out on the adjoining road.
E.g. A road is washed out in several places throughout the impacted area and extra impact signs are required.
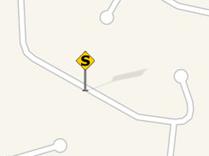
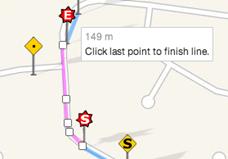
To add these signs to the map you must left first click the point on the map you would like to add a sign,
after you have successfully selected a map point you will notice a blue marker appear.
To change the blue marker to the required sign simply left the desired sign from the Available box.
The marker should then change to reflect the chosen sign.
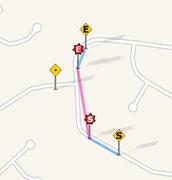
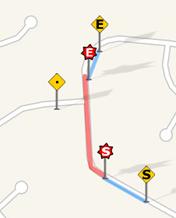
Repeat these steps for the other signs; the program automatically connects the markers with straight lines.
The default drawing path is a straight line between the impact points this can be modified to reflect a curve in the road.
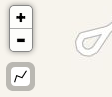
Using the line drawing tool located below the Zoom In/Out buttons users can customize the path.
Select the tool by clicking it.
With the Line Drawing tool selected click a point as close to the “Impact Start Point” as possible.
Each click will add point to the line; these points are shown as a small white box.
Continue to draw the line to create the desired route finishing at the end of impact sign.
When you are satisfied with the route, click the last square box to complete the line.
This tool can be used to follow a curvy road or to mark a detour.
The map should now reflect your updated route drawn with the Line Tool.
In the event you wish to remove a sign or line that has been placed just click the sign icon in the “Assigned” box located in the side menu.
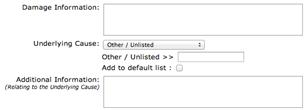
Additional information about the location can be optionally included in the text box below the locations section.
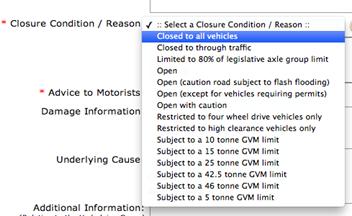
To select a “Closure Condition” click to drop down and choose the most relevant condition.
Once a condition has been selected a second drop down menu will appear and you can then select a reason.
The program will then automatically populate the box below with the Condition, Reason and Road Status.
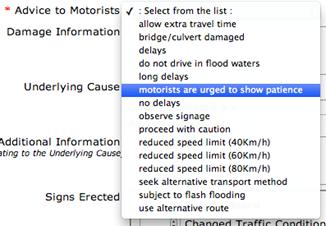
To select “Advice to Motorists” click the drop down list just the same as you would for the Closure Conditions above.
Users have the option to include further information relating to the closure.
This can be done by writing text in the appropriate text boxes and/or selecting Underlying Causes from the drop down box.
If an unlisted cause is entered it can be added to the default list by ticking the check box labelled “Add to default list”.
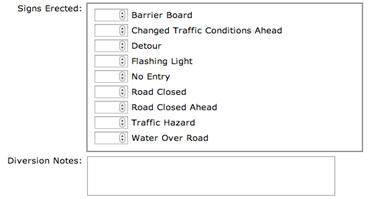
If applicable users have the option to record the signs erected.
These can be entered manually by clicking in the text box and typing or alternatively by clicking the up and down arrows in certain browsers.
Clicking in the text box and typing can enter diversion notes.
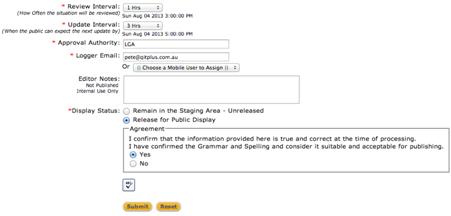
Users are required to set a “Review Interval; users can be notified by email when the interval update time is approaching.
This can be done by clicking the drop down box and selecting the appropriate time.
Should the closure fail to be reviewed in time, it will automatically be escalated to a Manager.
The “Update Interval” will be displayed to the public and is when they can expect to see the next update by.
This interval can be set by clicking the drop down arrows and selecting the desired time.
The “Logger Email” will be the email address the review reminder notifications will be sent to.
Alternatively a mobile user can be assigned to follow up by selecting them from the drop down box.
To complete the closure the user must select the “Release for Public Display” radio button
and confirm the information provided is true and correct at the time of processing.
The “ABC” button is a built in spell check that can be activated by clicking on it.
Click “Submit” to complete the closure.
When a Closure Event is “Released for Public Display” it cannot be placed back in the Staging Area.
This maintains continuity of any public displays.
2.1) About Scheduling
You can schedule certain road closure types to commence at a certain time, and automatically reopen the road at a certain time.
Scheduling can only be done via the web interface, not via the Mobile Application.
The closure types you can schedule a start date on are:
Roadworks and Special Events
Roadworks : Can have a scheduled start date applied. Not a scheduled end date.
The Roadworks type can be closed in the normal manner from the web page or via the Mobile Application.
Special Events : Can have a scheduled start date applied, and a scheduled end date.
The system recognises when the Special Event is to reopen and automatically performs all necessary actions.
When the corresponding closure types are selected, the relevant options will become active below the "Closure Condition / Reason" selection.
3) Editing a Closure from the Browser Interface
You can view the fill details of any closure by selecting the “Full Details” button from the map or listing of closure below the map.
You will see a detailed view of the Closure Event on the right hand side of your window, and the map on your left.
Notice the “Edit Closure” button at the top of the details.
Selecting this will send you to the same screen you saw when entering a closure. You can edit the details from here. You will need to confirm the spelling again before submitting.
When a closure is edited, the review and update intervals are reset. The clock starts again.
3.1) About Scheduling When Editing
As mentioned in 2.1, you can have scheduled times for Roadworks and Special Events.
Road works can have a start schedule, Special Events can have a Start and End Schedule Applied
If you change the closure type, to not match those conditions, the scheduled times will be removed automatically.
The Scheduled Times can be modified at any time simply by editing the closure.
If the Scheduled Start Time has already passed, the closure is active, and changing the scheduled start time is no longer an option.
You can change the Scheduled End Date/Time as long as the previously defined time has not been exceeded.
You can also remove the Scheduled End Date/Time simply by unticking the "I want to schedule an end date" checkbox.
4) Reopening a Road from the Browser
Enter the edit the closure as described above.
Reopening a road requires a “Closure Condition” of Open, and a “Closure Reason” of Open.
There is also a button on the side of these selections that will do this for you.
When the values have changed, check the “Advice to Motorists” and change if necessary, check your spelling and confirm, and click “Submit”.
The closure record will now be classed as open and not show up on your main map window.
The record is now locked, and cannot be reactivated.
If you require, you can however search for the closure, and clone to a new Closure Event.
5) Cloning Closures
For any reopened Closure Event, you can clone a New Closure Event from the old record.
Firstly, find your Closure Event you are interested in by searching or using the “Map” menu. View the “Full Details” of the event.
At the bottom of the details you will see a “Clone this Event” button.
Clicking this button will take you to the “New Closure” screen with the relevant information completed.
Modify / update the information as needed just like a New Closure.
6) Deleting Closures
Only a Closure Event that has remained in the “Staging Area” and “Not Released to the Public” can be deleted.
This feature is predominantly for creating a Closure Event for the purpose of creating a Known Trouble Spot.
At the bottom of the “Full Details” screen (of an unpublished Closure Event) there will be a button.
Clicking this will take you to a confirmation screen.
When you confirm the Closure Event will be deleted.
7) Known Trouble Spots
Known trouble spots are a way for you to maintain a list of those trouble spots that occur regularly.
You can create a dataset of Known trouble Spots, and create new Closure Events from them.
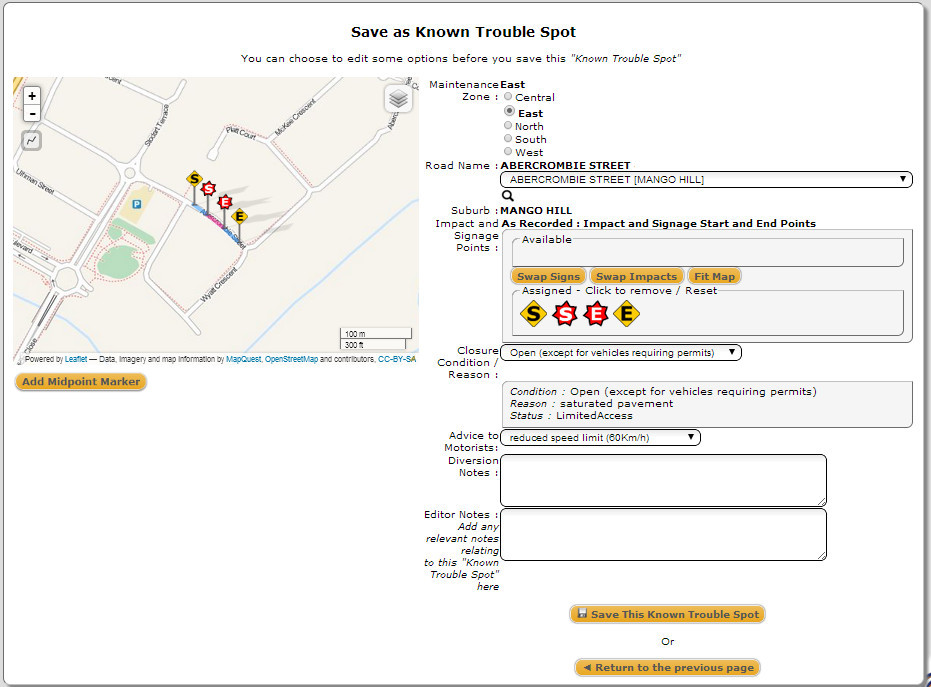
7.1) Create a Known Trouble Spot
If you want to start from scratch, and create a database of Known Trouble Spots, follow these steps.
1. Create a “New Closure” with the relevant information BUT, leave it in the staging area, do not release to the public.
2. View the full details of the Closure Event you just created, and select the “Create a Known Trouble Spot from this Closure” button at the bottom.
3. You will be taken to a screen like this
4. Fill in any “Diversion Notes” and “Editor Notes” if required and click the “Save This Known Trouble Spot” button.
5. Now you can delete the Closure Event you created.
You can view your “Known Trouble Spots” by selecting from the menu of the same name.
They are denoted with an animated Map Pin.
7.2) Using a Known Trouble Spot
1. Select “Known Trouble Spots” from the Menu
2. Select the “Known Trouble Spots” from the Map or Listing below the map
3. On the Right Hand Side, click the “Create New Closure” button.
This will create a New Closure with the details from the “Known Trouble Spot” prepopulated with the relevant details.
7.3) Editing a Known Trouble Spot
You can edit a known trouble spot at any time. It will not cause any changes to Closures that were generated using the particular Known Trouble Spot.
Find the “Known Trouble Spot” as described above, but this time select the “Edit this Known Trouble Spot”
From here you can change any of the available attributes of the Known Trouble Spot.
Almost Identical to the screen shown for the Create Known Trouble Spot Page.
Simply make your changes and save.
At the bottom of the map on the Edit "Known Trouble Spot" screen there is a button to add the "Add Midpoint Marker".
You can use this to add a marker add the Midpoint (Between Signage) as a reference when you are zooming in and dragging pins around.
7.4) Deleting a Known Trouble Spot
If a “Known Trouble Spot” is no longer relevant or required, you can delete it from your “Known Trouble Spot” database.
Find the “Known Trouble Spot” as described above, but this time select the “Delete this Known Trouble Spot”
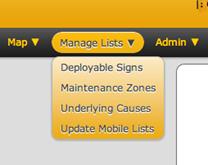
8) Manage Lists
The “Manage Lists” section allows you to customize the list selections used to add new and edit existing closures.
Click the drop down arrow to access the various lists available to edit..
When a list is updated via the Browser interface, the list will be updated on the Mobile Devices.
The Integration Monitor, running as a background task, will recognize that there has been a change
to the list and send that list to the QIT+ server to be updated on the devices.
Typically this will happen with 5-10 minutes of the changes being applied.
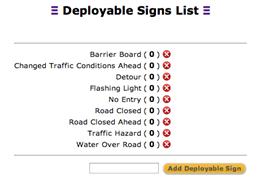
8.1) Deployable Signs
The deployable signs list is an optional selection users can add when adding or editing a new closure.
Signs can be added and removed from the list from this screen.
8.1.1) Adding a Deployable Sign
To add a new deployable sign navigate to the text field and enter the name of the sign to be added.
Click the “Add Deployable Sign” button to add it into the list.
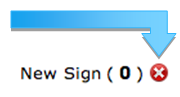
8.1.2) Deleting a Deployable Sign
To remove a sign from the list simply click the Red Cross next it in the list.
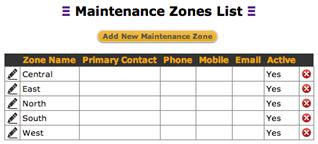
8.2) Maintenance Zone Lists
The maintenance zone list holds the data for the maintenance zones users select from when adding or editing closures.
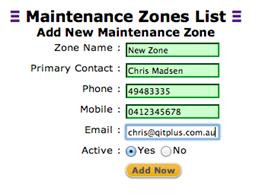
8.2.1) Adding a New Maintenance Zone
To add a new Maintenance Zone, start by clicking the “Add new Maintenance Zone” Button.
After clicking the button the “Add new Maintenance Zone” editor will appear.
Enter the appropriate information by clicking in the text boxes and typing.
The zone must be marked as “Active” for it to be shown to loggers.
Click the “Add Now” Button to add the new Zone to the list.
8.2.2) Deleting a Maintenance Zone
To delete an existing Maintenance Zone, click the Red Cross next to it in the list.
8.2.3) Editing a Maintenance Zone
To edit a maintenance zone click the edit icon located on the right hand side of the record in the list,
this will bring up the same screen as when a new zone is being added and the information can be edited and updated.
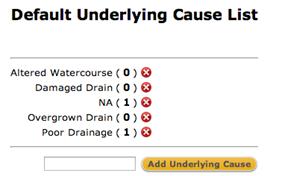
8.3) Underlying Causes
The Underlying Cause list is a part of the optional information available to users when adding or editing new closures.
8.3.1) Adding a New Underlying Cause
To add a new Underlying Cause click the text box and type in the cause.
Once a cause has been entered click the “Add Underlying Cause” to add it to the list.
8.3.2) Deleting a Underlying Cause
To delete an underlying cause locate it in the list and click the Red Cross to remove it.
8.4) Custom Roads List
You can add Custom Roads to the Master Roads List
Where a local road is not listed in the provided road list,
or an alternate common name is used for the road.
8.4.1) Adding a New Custom Road
The are 2 Ways to add New Custom Roads
1. While Creating a Closure
In the New Closure page you will see a
next to the Road Name Label.
Clicking this will present you with a panel to enter a new Road Name and select a Suburb / Locality
I.E.
2. Through the Manage Lists Menu
Under the Menu Manage Lists / Custom Roads List
Select the
An input panel the same as the above example will be shown.
8.4.2) Deleting a Custom Road
Any custom roads you have added will appear under the Menu Manage Lists / Custom Roads List
An entry will loo like......
MY CUSTOM ROAD [BURTON]
To delete an entry - simply click the delete icon
Deleting an entry will not impact any current or historical closures
9) User Management
The application can be configured to run in Anonymous or Windows Authentication mode, or both at once.
Anonymous means that users will need to select Login from the menu and enter their username and password.
Windows Authentication means that the credentials supplied when logging onto the computer you are using are passed to the application, and your login detected from there.
This means you are not required to login, as long as you are on a Windows Domain Authenticated computer.
All users are allowed to view the applications web page without having a Login created.
However, to add, create or modify Closure Events, a login is required.
Where creating or editing a user, there are 3 parameters that will define their privileges.
System Administrator
Administrators have access to all areas within the application.
System Manager
Managers can manage the Closure Events.
Mobile User
When Mobile User is activated, the user will be provisioned in the cloud service and an invite sent to their email to download the Mobile Application and login.
9.1) Creating a New User
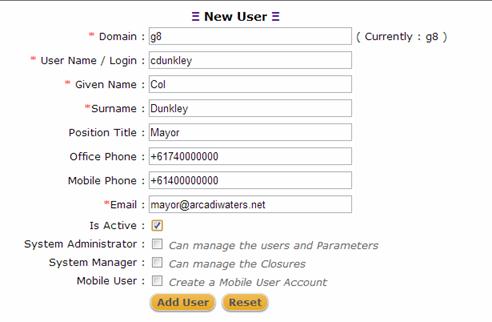
From the Menu, select “Admin -> Add New User”
You will be presented with a Screen that shows all the fields required for a new User.
This screen is from the Windows Authentication mode. You can see a domain designation in the first field, this will auto populate.
Simply complete the fields, required fields will have a red asterisk beside them. *
If we assign the roles of Administrator, Manager and Mobile User as required.
Any one, or two or all 3 can be assigned.
Simply click the “Add User” button to create the user.
9.2) Managing Users
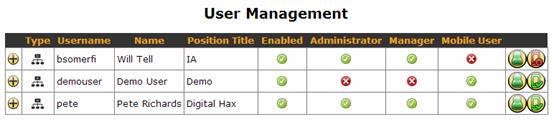
From the Menu, select “Admin -> Manage Users”
You will see a list of users.
You can see the status of users based on the tick or cross icons.
You will also notice the 2 icons on the right hand side. These are a quick reference to the user state.
The first one will be either red or green, indicating the users “Active” status. Active Disabled
The second icon indicates the Mobile Provisioning Status Mobile Provisioning Complete Mobile Provisioning Not Enabled Mobile Provisioning in Progress
When the Mobile Icon is orange, it means that the integration task to create the user in the cloud service has not yet completed. This can take up to 5 minutes.
To see the details of a user, click the plus icon on the Left Hand Side.
This will expand the user’s details, and show an edit icon on the Right Hand Side.
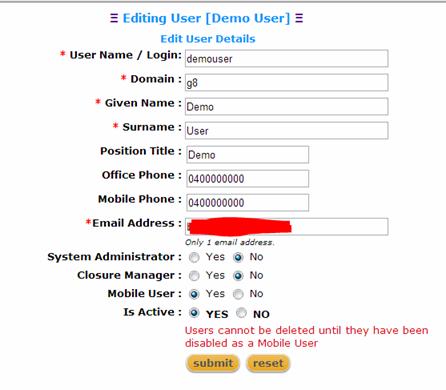
Click the edit icon and you will be in the edit user Screen.
You can change any of the settings here to suit your requirements.
You will note that near the bottom it states in Red that “Users cannot be deleted until they have been disabled as a Mobile User”.
If this was not a mobile user a delete button would also appear.
This is a security feature that ensures the user provisioned in the cloud is removed and not accidentally left registered by mistake.
When “Mobile User” is disabled, a task will remove the user from the cloud service, and free the user up for deletion.
Once a user is removed from the cloud service, they can no longer log into the mobile application and add or modify closures.
The data and forms stored on the mobile device will also be erased.
10) Using the Mobile App
10.1) Create a New Closure
See the YouTube Video
10.2) Reopening a Road Closure
10.3) Edit a Road Closure from the List
10.4) Edit a Road Closure from a Received Task
10.5) Seeing a List of Mobile App Users
You can see a list of Mobile Users by taping the “RC Users Icon”.
Once it is opened you will see a list of the Mobile Users.
Select one and you will see the details of that user.
10.6) Logging in Changing your Password
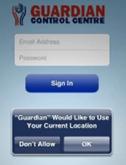
When created within the Application and Mobile enabled, you will be sent an email with your login details and a link to the app in Google Play, and Apple App Store.
The Login / Username will be your email address prefixed with a number and a $ symbol.
Example:
Login: 123$myemail@company.com
Password: 201234556
Install the app from the relevant Store.
Open the App and login with your supplied credentials.
If you are asked if the app can use your Current Location, say yes. This will assist you in entering closures.
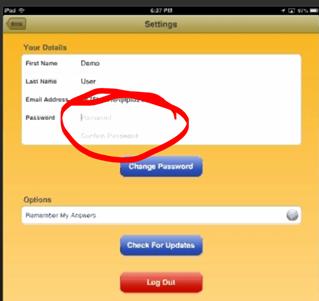
Once you are logged in, you can change your password to something you will remember.
11) System Parameters
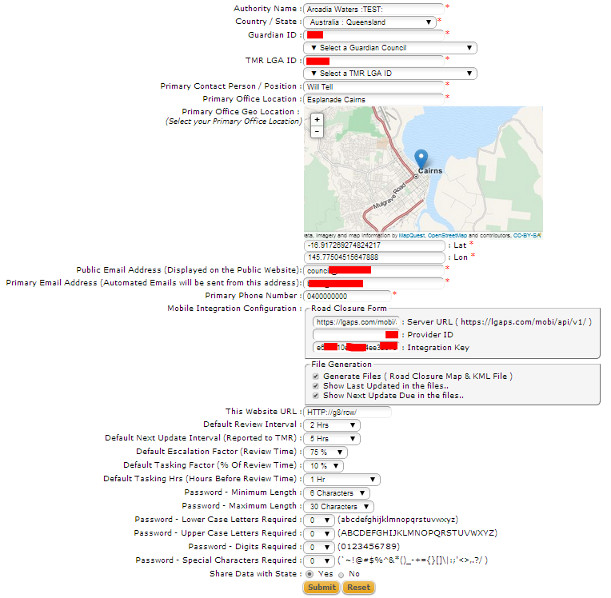
Found under the “Admin >> System Parameters” menu.
These parameters define how the system runs. You should consider any changes made here.
We will go through each parameter and explain its purpose.
11.1) Authority Name
The name of your authority or organization!
In the screenshot shown above you will notice :TEST: appended to the Name.
When this is included at the end of the Name, the website shows the [TEST] in the banner so there is no mistaking which system you are in.
11.2) Country / State
Simply select your state.
11.3) Guardian ID
The Guardian ID is the Council ID that is used by Guardian to identify your site. Guardian is using the number used by the state to identify LGA’s.
This should not be altered.
11.4) TMR LGA ID
This is the same as the Guardian ID, but with 30000 added. It is ABS ASGC (Australian Standard Geographical Classification).
This should not be altered.
11.5) Primary Contact Person / Position
This is the Person or Position that should be contacted should TMR need to contact someone.
11.6) Primary Office Location
Typically this would be the address of your Main Office.
11.7) Primary Office GEO Location
Using the inbuilt map, you can pinpoint the location of your Primary Office.
These coordinates will be used as the logger location of any new Closure Event created from the Browser Interface.
11.8) Public Email Address
This is the email address that the public would see if wanting more information.
Should you or TMR publish an email address, this is the one that should be used.
Typically it may even be your standard customer service email address.
11.9) Primary Email Address
This is the email address of the closure manager. We would recommend that this actually be a distribution
list address, and the membership of that group or distribution list be maintained.
In this way the configuration does not need to change when employees change.
Alerts about new Closure Events needing attention, or review intervals being exceeded will go to this address.
11.10) Primary Phone Number
Again, if used, this should be the main customer service contact number.
11.11) Mobile Integration Configuration
The first box contains the "Road Closure Form" Settings
As the name suggest, these are critical for the mobile integration to work correctly.
These will be configured at install time and should not be altered.
The second box "File Generation" Settings. This one you can alter to suit.
Ticking this box tells the system automatically generate a collection of files that allow you to easily
integrate the Road Closure Information into your public Website.
These files will be created in the folder where the Mobile Integration Program resides.
These files can be published on your website with a scheduled copy job or another mechanism determined by your IT Staff.
The Files Generated are:
RoadClosures.html
Description: This is an interactive map. It is also
mobile and tablet optimised.
Usage: This file can be copied up to your public website via
any mechanism deemed suitable by your IT Staff.
RoadClosureHtmlText.html
Description: This web file is a list and description of the
Road Closures in text format. It is a complete web file with styles
defined.
Usage: Again this file can be copied up to your public website
via any mechanism deemed suitable by your IT Staff.
RoadClosuresHtmlText.inc
Description: This file contains the same content as the
RoadClosureHtmlText.html file, but is not a complete web page.
Usage: It is designed to be included in an existing we page.
i.e. using <!-- #include file="RoadClosureHtmlText.inc" -->
The class tags still exist in the file and can be used to overlay your own
styling to the file.
The Class Names are:
rc-title
The List Title
rc-generated
The Generation Date
rc-table
The Table containing the information
rc-tr
The Row for each record
rc-td-road
The Cell containing the Road and Suburb
rc-td-detail
The Cell containing the details of the closure
rc-status-open
Colored wrapper around the Open Status
rc-status-closed
Colored wrapper around the Closed Status
rc-status-limitedaccess
Colored Wrapper around the Limited Access Status
rc-details-label
The Label for each item in details
rc-disclaimer
The Disclaimer Label
rc-disclaimertext
The Text of the disclaimer
RoadClosuresPlainText.txt
Description: This is a plain Text file detailing
the road closures.
Usage: This can be copied to you website as
well, as a plain text option, or emailed to particular recipients.
RoadClosures.kml
Description: The KML file is used by google maps
/ earth to show geographic information.
Usage: This can also be copied to your public
website if you choose.
These file can all be used or only one, they will all work independent of each other.
The Other two check boxes let you decide if you want the Last Updated and Next Update dates to be included in the files.
If you would prefer not to have one or either of these displayed publicly, simply uncheck them.
The next file generation will not include them.
11.12) Default Review Interval
The default period you wish to have Closures reviewed in, or how often you want an update supplied.
You can edit the review periods on each Closure, but this will be the default applied to each new Closure.
11.13) Default Next Update Interval
Similar to the Review Interval, however the Update Time is what we recommend be published to the public website.
If you set a review interval of 6 hours, the Update Interval must be greater than 6 hours.
11.14) Default Escalation Factor
This is a percentage of the Review Time.
If a review has not been completed by this percentage of the review period, an alert will be sent
to the Primary Email Address notifying the manager that the threshold has been breached.
11.15) Default Tasking Factor
At what percentage of the review period should a task be sent to the assigned officer to inspect and update.
11.16) Default Tasking Hours
Similar to the Tasking Factor, but a set period of hours.
The task to review will be sent whenever the Tasking Factor or the Tasking Hours threshold has been met.
11.17) Password Requirements
The Password fields are relevant for applications setup without Windows Authentication.
In these scenarios where a manual login is required, thee settings allow you to configure the password requirements to match your corporate network security policy.
11.18) Share Data with State
If you elect to Share and Receive data from the State (TMR), select the Yes radio button. You will be shown a statement you must confirm / agree to.
Sharing this Data means that you agree to allow your Closures to be distributed to TMR’s 131940 system. From there they will be displayed on the 131940 website.
A few things will also happen. Your closure points will be rectified to the road centreline. Any polylines will also be rectified to the road centreline.
This data will be returned to your application. TMR closures will also be registered in your application.
12) FAQ
12.1) Can I use the Mobile app for anything else?
The application can be used for any variety of form input or information gathering.
If you are interested in using this technology, contact QIT Plus and we can show you how easy it is.
12.2) What if I am out of Mobile Range, will the app still work?
The app will still be able to record information. The only thing that will not work is the mapping.
You can however simply get the devices GPS coordinates instead of using the map.
When you return to Mobile Range the data will automatically be uploaded.
12.3) Is there an app for Windows Mobile or Blackberry?
No. Unfortunately the market share for Windows Mobile and Blackberry are not significant
enough to warrant the effort for development in these platforms.
This may change in the future.
12.5) What about data Security?
Data from your server to and from the cloud, and to and from the Mobile device is all encrypted.
The data stored on the Mobile device is also encrypted, and wiped from the device when the user is disabled.
12.5) What about data sovereignty, where is the cloud data stored?
QIT Plus has a Tier 1 server hosted in Australia. No data is stored outside Australian borders.
12.6) Browser Settings?
Specifically with IE there are some circumstances where the settings may not allow you to perform a location serach.
If you are getting no results in the street search...
From the IE Menu : Select Tools -> Internet Options and select the Security Tab
Select Local Intranet, and click the sites button.
Add your Road Closure Server Url into the sites.
If you get warning messages about accessing data from another site, you can stop them be following these steps.
From the IE Menu : Select Tools -> Internet Options and select the Security Tab
Select Local Intranet.
Click the Custom Level Button.
Scroll down to the Miscellaneous Branch.
Enable Access data sources across domains.


 Active
 Disabled
 Mobile Provisioning Complete
 Mobile Provisioning Not Enabled
 Mobile Provisioning in Progress
 on the Left Hand Side.
 on the Right Hand Side.